I’m sad that I forgot to take photos, but here’s what I baked for Thanksgiving:
I made really terrible sourdough rolls. We ate them, and they didn’t taste terrible, but they really were a colossal failure. The primary issue was that I didn’t leave myself enough time, combined with my inexperience and ignorance about turning my usual Tartine sourdough recipe into rolls. The result was that the rolls looked OK, but inside were horribly dense and heavy. I mean, they had the density of bowling balls. I’d like to give this another go and see if I can make this work. This was definitely an example of my being unjustifiably cocky about what I can do with sourdough. I’m really still just a noob, and was robustly reminded of that with these rolls.
I made my classic apple pie, but this time I pre-cooked the apples on the stovetop. I think this helped with my usual problem of ending up with a gap between the apples and the top crust, but I changed another variable that also helped: I made a lattice crust rather than a solid crust. So, not enough data, but at least I didn’t have the gap.
I made the Joanne Chang Rich Chocolate Cream Pie, and it was great. Following the instruction to chill before blind baking the crust seemed to really forestall any “slumping”. I did fill the thing up with foil and pie beads, and will continue to, but the dough seemed quite sturdy this time.
So, I wanted to try the updated croissant recipe that I saw in Joanne Chang’s newer cookbook, Pastry Love. In my comparison chart I refer to this as “Chang 2”. Here are the differences that I saw:
The newer recipe is for “spelt croissants” so the flour content is half spelt flour and half bread flour. Her original recipe is 3/4 all-purpose flour and 1/4 bread flour, but the overall flour volume is nearly the same, as is the flour to liquid ratio. I wasn’t interested in trying the spelt variation, but it seemed safe to stick with the original all-purpose/bread flour approach from the original recipe.
The newer recipe eliminates the step of mixing 2T of butter into the dough itself. That 2T of butter gets added into the butter block, so it’s not removed overall. It just doesn’t have to mixed into the dough. I appreciated the idea of saving some work, so I went with this change
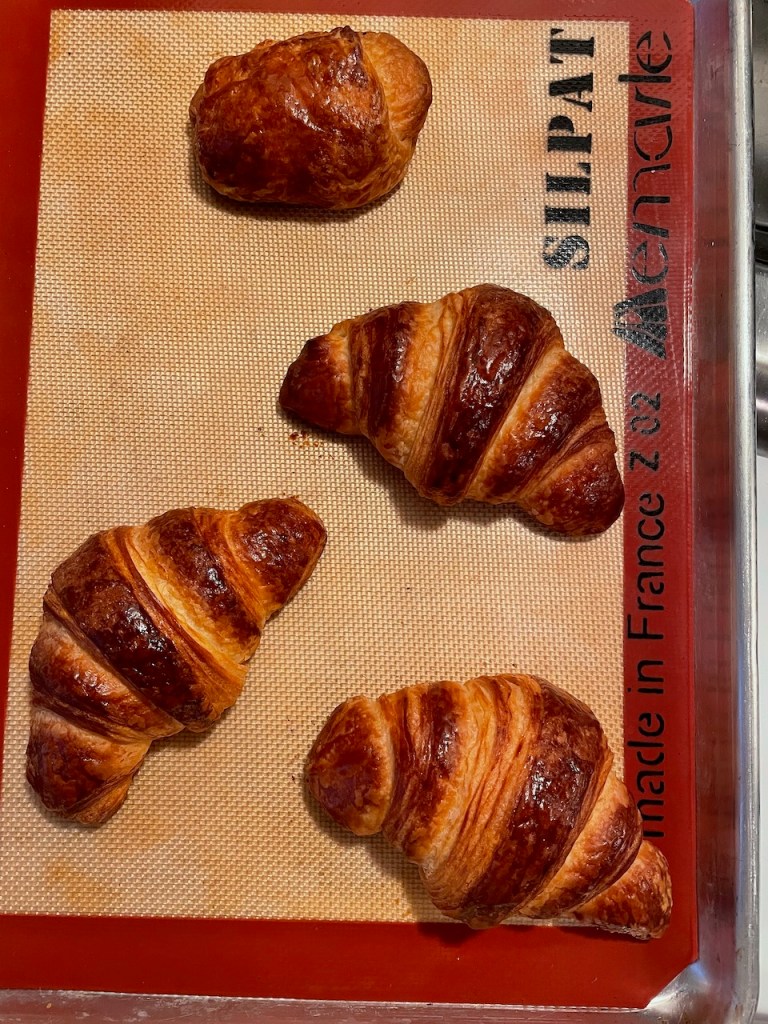
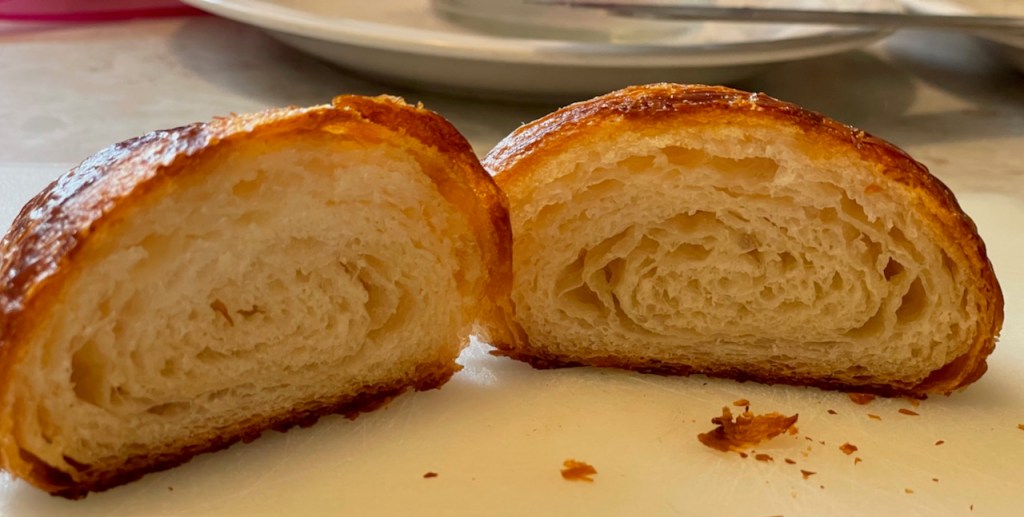
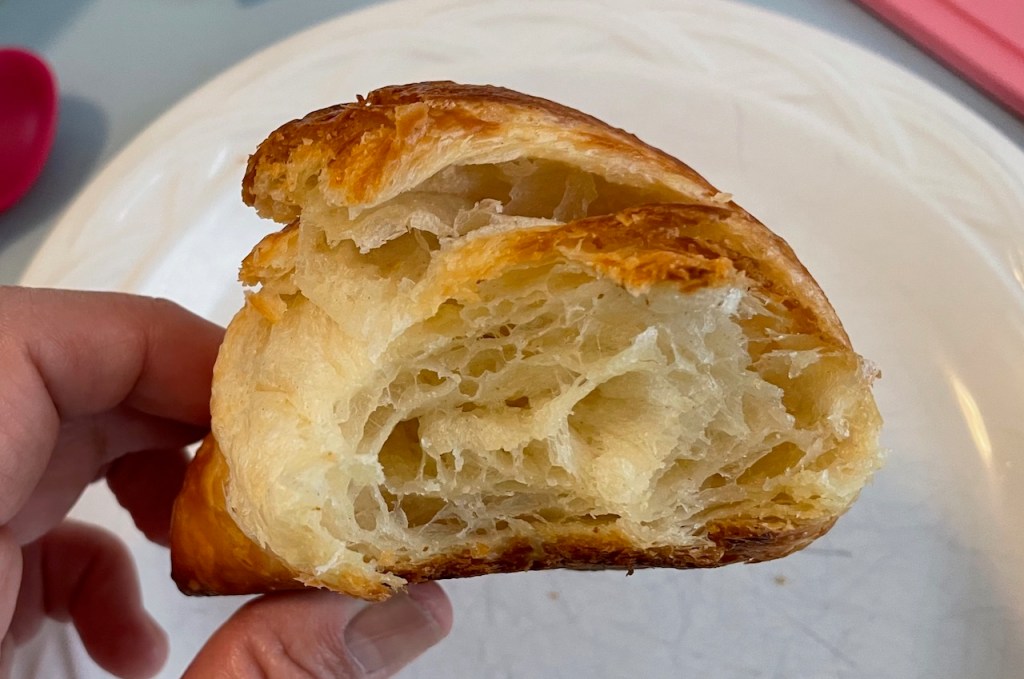
Her lamination method is notably updated. Rather than book-fold/letter-fold/chill/letter-fold, this recipe has only two book-folds and that’s it. No mid-lamination chilling! Because of my prior issues with the butter breaking up after being chilled mid-lamination, I am especially excited about this change. And, it reduces the overall duration of the effort (because it takes away one chill step and one fold step). We’re now down to 16 layers (having already gone from 729 -> 36), and I haven’t seen a deterioration in the flakiness of the end result.
I should note that Joanne’s newer lamination method isn’t a classic “book fold”. I think of it as a “modified book fold” and haven’t seen it described anywhere else. It is essentially the same, and still creates the four layers as a regular book fold. The only difference is that all the dough ends are not concentrated in the middle of the dough packet. She offsets the “seam” a bit, and I think this is another tweak that helps maintain the structural integrity of the desired rectangular shape. It’s hard to explain the difference without just sending you to her book (Pastry Love), which has very helpful instructions and photos.
I love the idea that Joanne Chang and her team at Flour Bakery are looking for ways to improve things – even very good things. The lamination method has nothing to do with the spelt change, so this seems to be entirely a process improvement.
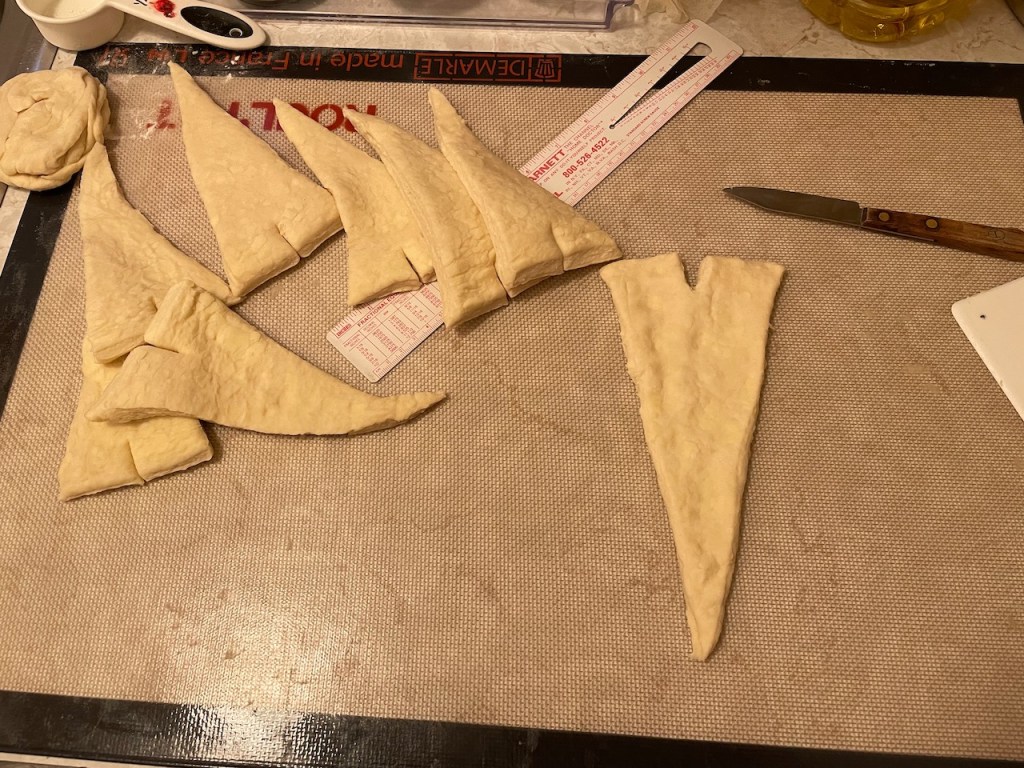
I think I haven’t explicitly mentioned that I make one Pain au Chocolat with each batch of croissants using any leftover bits of laminated dough. (You can see it in the first photo at the top of this post.) I mush the bits back together and roll them out into a rectangle, then roll up some dark chocolate batons and bake with the rest of the croissants. I have to say that these little treats, made from the “leftover bits”, have been such a delight that I think I will try to make more of an effort to allocate some proportion of the next batch to Pain au Chocolat – not just the scraps!
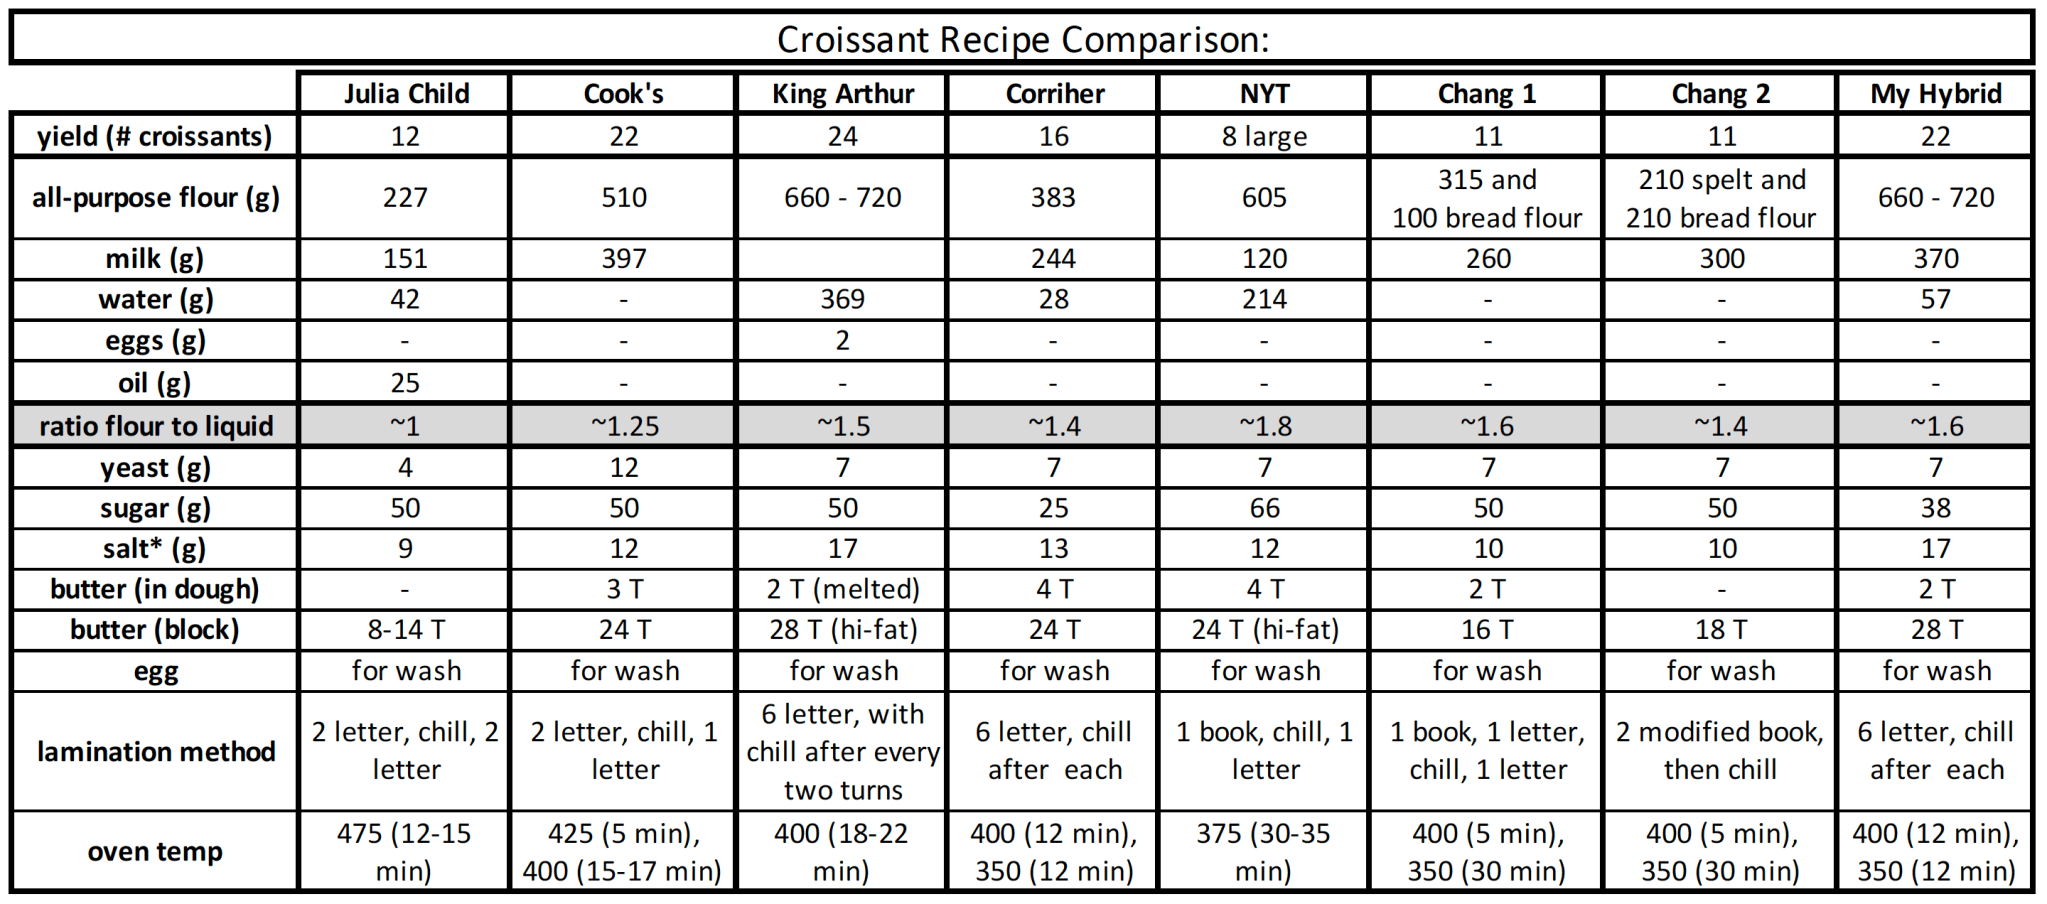
If you check out the comparison chart that I made to identify differences between various croissant recipes, you’ll see the wide variety in lamination methods (in the 2nd to last row). For my attempt last week, I wanted to try Shirley Corriher’s lamination method, because I figured: the more lamination = the more better. She also had this peculiar technique of brushing each rolled layer with ice water, and I wanted to see if this worked.
But, I wasn’t convinced by that experience. As I wrote in that prior post, I had big problems with the butter breaking apart after being chilled, and things just kinda went off the rails from there. Yes, I was able to do the 6 turns, and yes the results were great. But, I remained curious whether other techniques could solve some of the logistical problems.
For instance, I found it really hard to roll things out into rectangular form. The cumulative effect of a seemingly small issue of “roundness” (as opposed to “squareness”) was pretty horrible as the turns increased. It seemed that there were big blobs of unlaminated dough extending off the ends of the dough packet, and these appendages just kept getting bigger and bigger. And, it irked me that the scientific-minded Corriher hadn’t accounted for the butter breakage or rolling technique in her recipe.
So, I tried again, but this time I went 100% with the Joanne Chang recipe. This attempt faithfully follows the recipe from her first book, Flour, which is referred to as “Chang 1” in my comparison chart. Notably, this method has only three folds (or “turns”), where the first two (one book and one letter fold*) occur before any chilling, then there’s one more letter fold after chilling. This, compared with Shirley Corriher’s six letter folds, each interspersed with chilling!
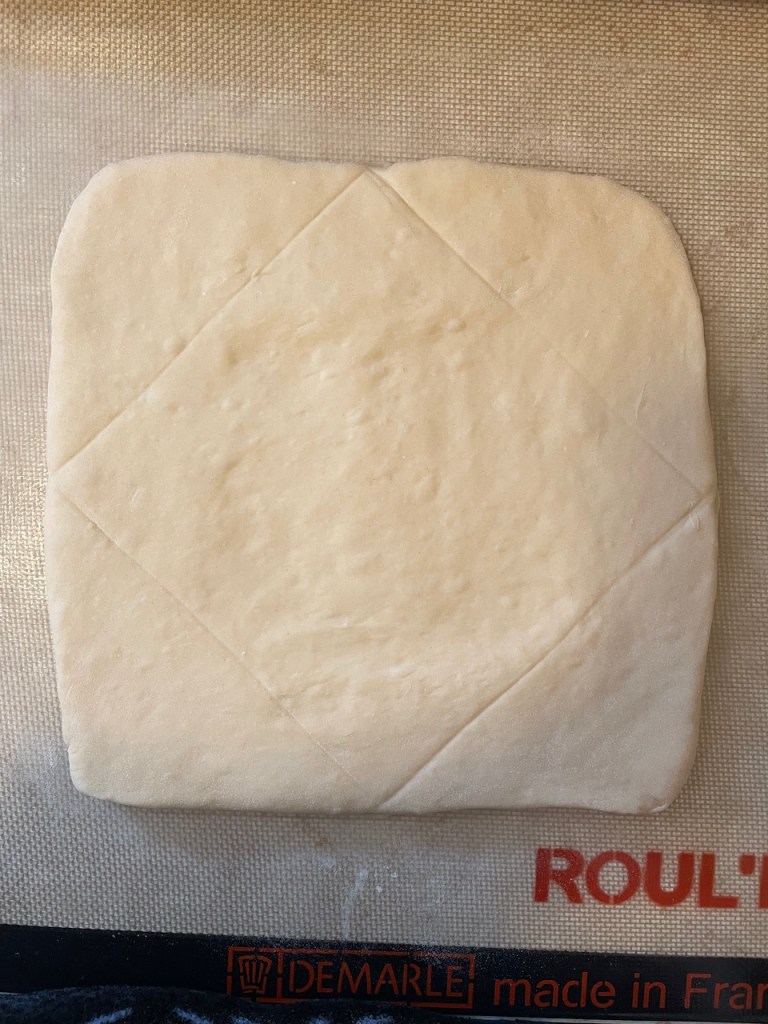
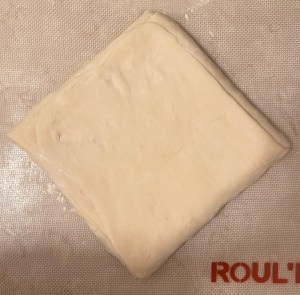
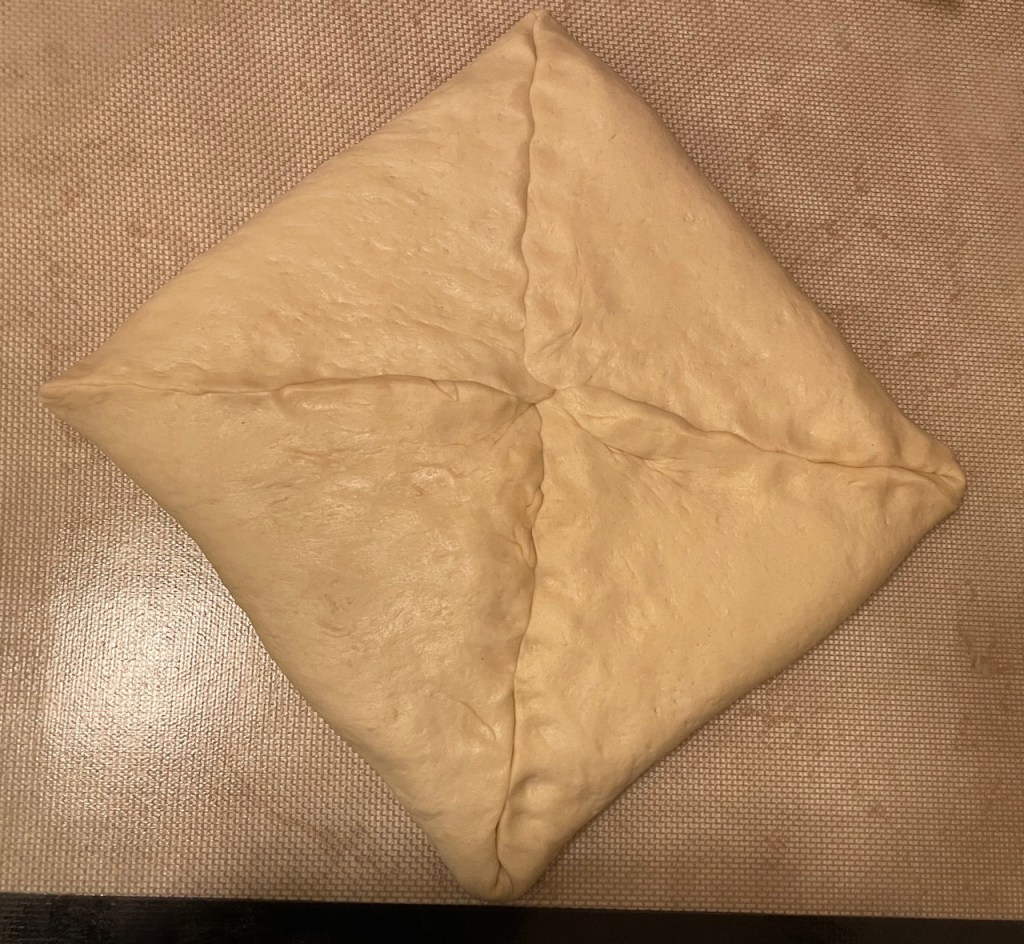
Another difference that I didn’t think would matter, but did, was the method that is used to encase the butter at the outset. I am now convinced that this makes quite a big difference. If you look at my first photo above you’ll see that I’ve marked the dough per Joanne’s instructions. Her technique says to place the butter block on the dough so that the dough’s corners are exposed (actually, so does Shirley, see this photo). The part that is really different is that Joanne says to then flatten out the four exposed dough corners – to the extent that each corner will fully cover the entire butter block. So, the butter is enclosed on one side by at roughly 3/4″ layer of dough and on the other side by four flattened out layers of dough (the parts that were the dough corners). Here’s mine after flattening and folding in the corners so that the butter is fully encased.
The reason this turned out to be better for me is that it helped to establish a shape and structure that rolls out to be more square than round. It avoids putting large blobs of unlaminated dough in the middle or edges of the dough packet, instead establishing a more even, rectangular shape from the beginning.
A few more notes to add:
Joanne addresses the butter-breaking issue by suggesting that you first use the rolling pin to press on the dough layers up and down the dough, and only afterwards roll out the resulting ridges. She explains that the goal is to get the dough and the butter to form even layers, without any one part extending beyond any other part.
I’ve taken to thinking of the lamination rolling step as, actually, rolling out the butter — where the dough is just along for the ride. The butter is really the important layer to get thinned and extended before folding.
I don’t think there was a loss with the fewer folds compared to last week’s attempt. Theoretically, six letter folds makes more than 700 layers where a book fold and two letter folds makes 36. In fact, this King Arthur article addresses why fewer turns actually makes a better result.
* If you’re not familiar with terms “book” and “letter” fold, you can see a primer here. The basic difference is that a book fold creates four layers and a letter fold creates three.
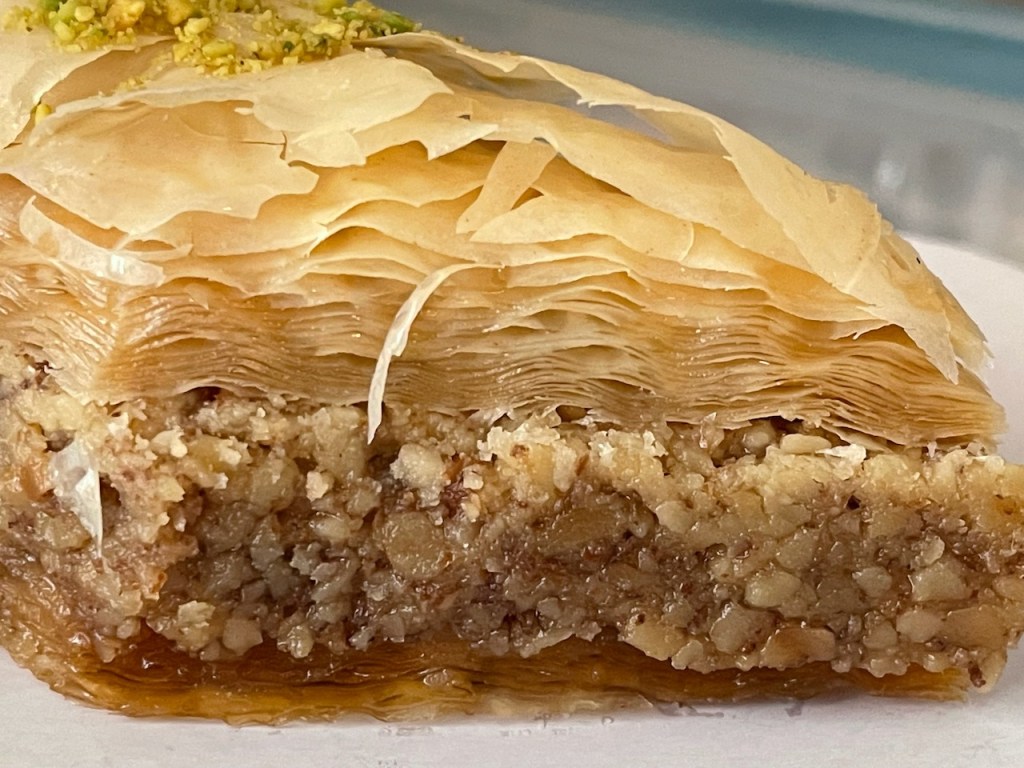
This is actually my third try at baklava. I didn’t take any photos of the first two, because they were generally awful. The whole process was awful, and apparently I didn’t want any evidence of their existence.
The problem with the first two attempts was that I tried to make it inside of a rectangular pyrex dish. Maybe for someone who knows what they’re doing this would have been fine. But for me, I had major problems getting the thinly-rolled dough to behave properly in the dish. It tended to contract or otherwise not behave when buttered, yielding an ugly mess. I think it was a mistake to trim the rolled dough before trying to place it in the dish? Maybe having extra would have helped. I don’t know
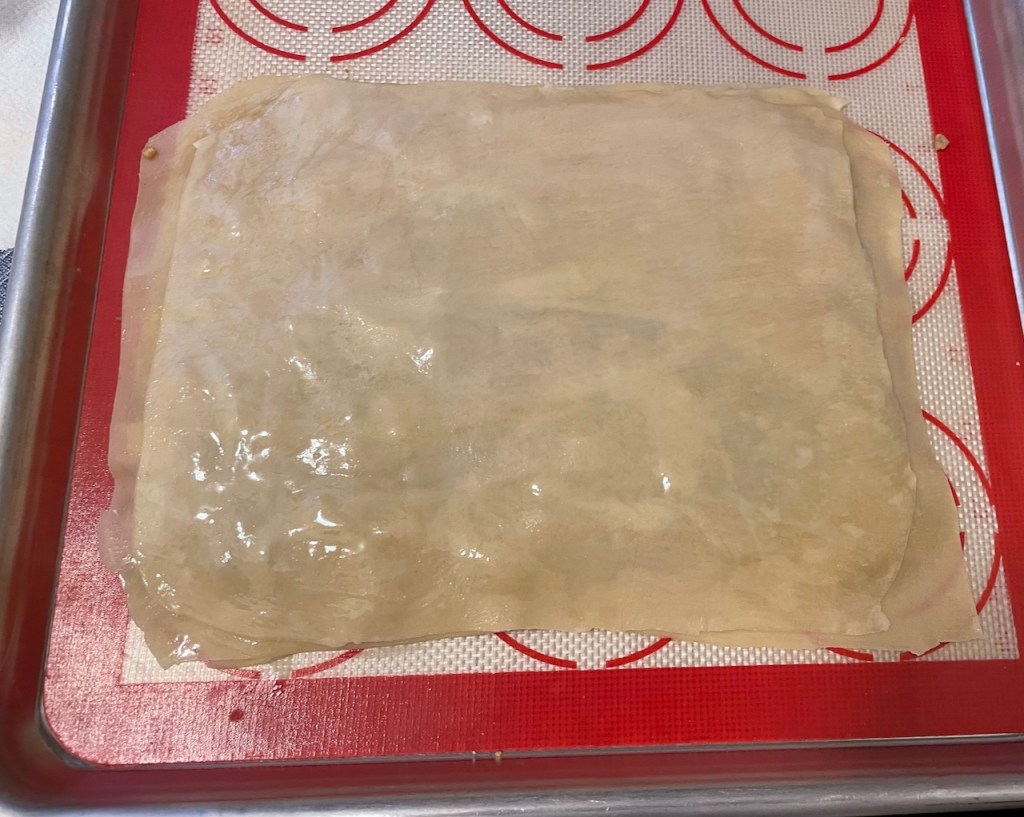
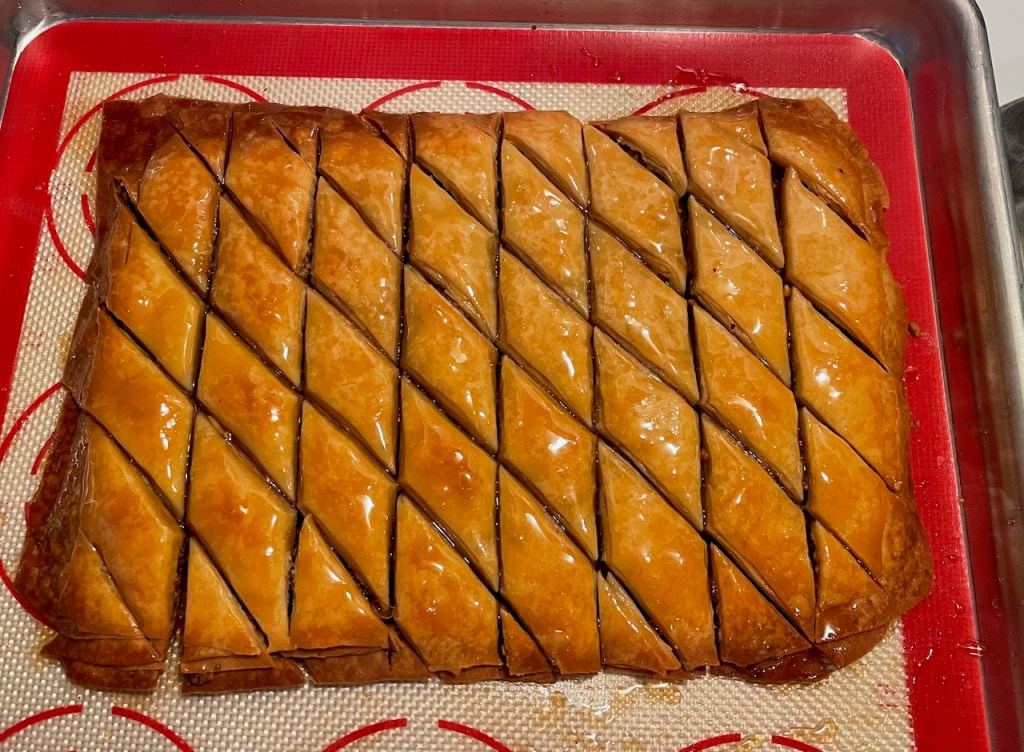
Anyway, this third attempt was more successful because I ditched the pyrex dish in favor of a sheet pan. I rolled the phyllo sheets out and just built the baklava layers on the pan. The dough behaved better and stayed thin, and I was still able to pour the syrup on and have most of it stay within the pastry. One downside was that I couldn’t use a knife to cut the diamond pattern, because I didn’t want to cut the silicone pad. Instead, I used my plastic bench scraper to make the cuts. In hindsight, I could have built the baklava on parchment and then used a knife.
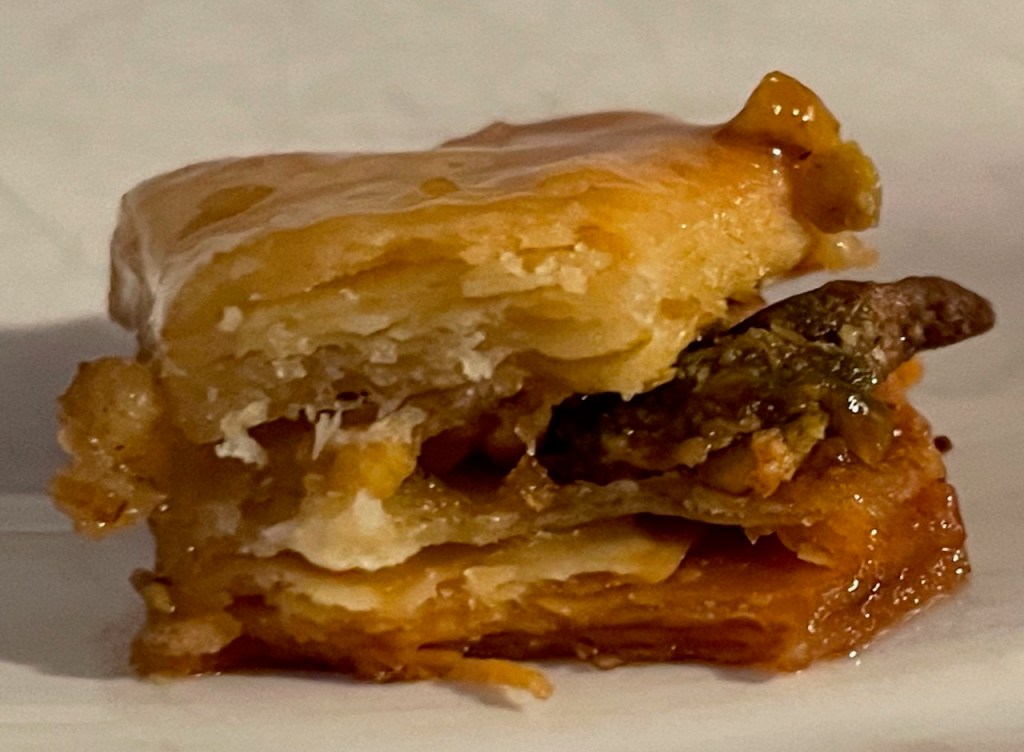
TBH, my conclusion from all this is that, for baklava, I don’t think it’s worth making the phyllo dough. Baklava really needs the paper-thin sheets that you get with the bought stuff. No matter what, mine weren’t going to be that thin!
I do wonder if the Paul Hollywood cornflour method would work. I’m tempted to try, but maybe not motivated enough. Here’s why: I bought a piece of baklava from Cafe Barada a few days ago, and it was just sublime. I mean, it was light, delicate, only gently sweet. Just perfect. Why work hard to make something so inferior? This is Cafe Barada’s baklava. I mean, look at this thing of beauty…
Making the Kouign Amann and the phyllo pastry pointed me towards making croissants. I have made them once (years ago), but I wanted to try again. I started by doing some research and comparing recipes and techniques from: Julia Child (Mastering the Art of French Cooking, Vol. 2), Cook’s Illustrated (Jan/Feb 2012), King Arthur Baking Company (Baker’s Companion), Shirley Corriher (BakeWise), The New York Times (recipe with link to helpful video), and two versions from Joanne Chang (one from her first cookbook, Flour, and another from a later cookbook, Pastry Love). It surprised me how varied these all were. I decided to try making a hybrid version, mostly based on the King Arthur proportions and overall volume, but using the Shirley Corriher lamination method because it had the most folds. [You can click on the table below to enlarge it.]
My biggest problem with this batch came with the second turn (after the first chill). As with the Kouign Amann, the butter got too cold and when I tried to roll out the “packet”, the butter inside broke into pieces rather than spreading out. I decided to let the dough sit and warm up before proceeding, and for the 3rd through 6th letter folds I did not chill the bundle between the folds. Instead, I let the dough sit on the counter in my cool (60°F) kitchen.
I think the lamination was OK, but that broken-butter 2nd turn wasn’t pretty.
Surprisingly, only Julia Child and Joanne Chang even raise the topic of the butter possibly breaking apart and how to avoid that. It seems to me that, given this and my previous experience with the Kouign Amann, this is a common problem. Or, is my fridge colder than most?
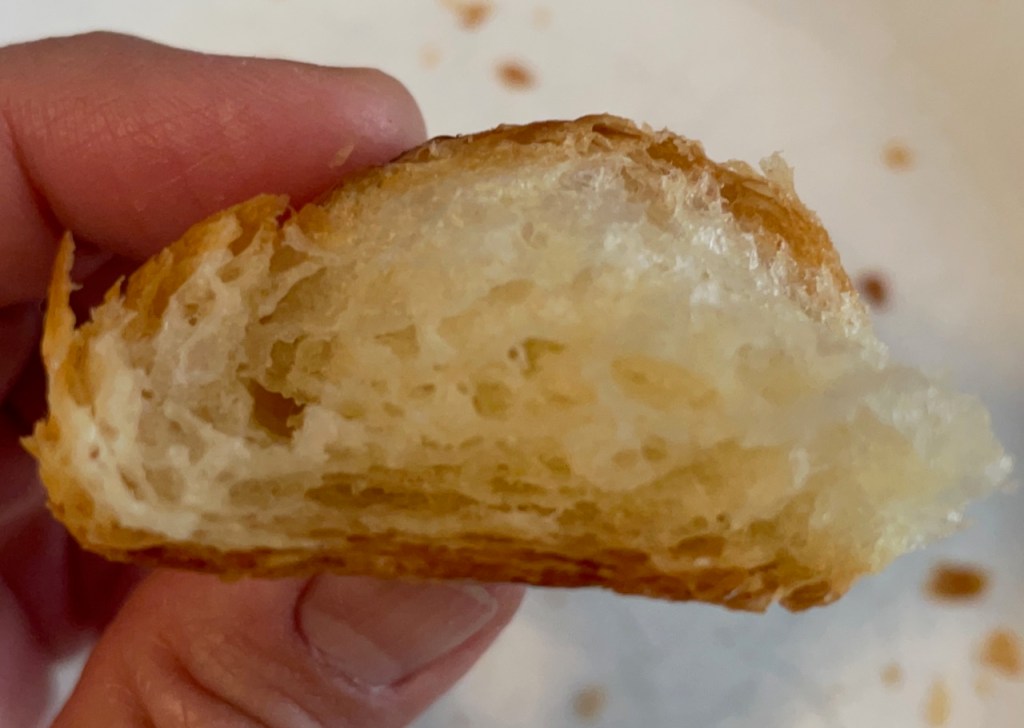
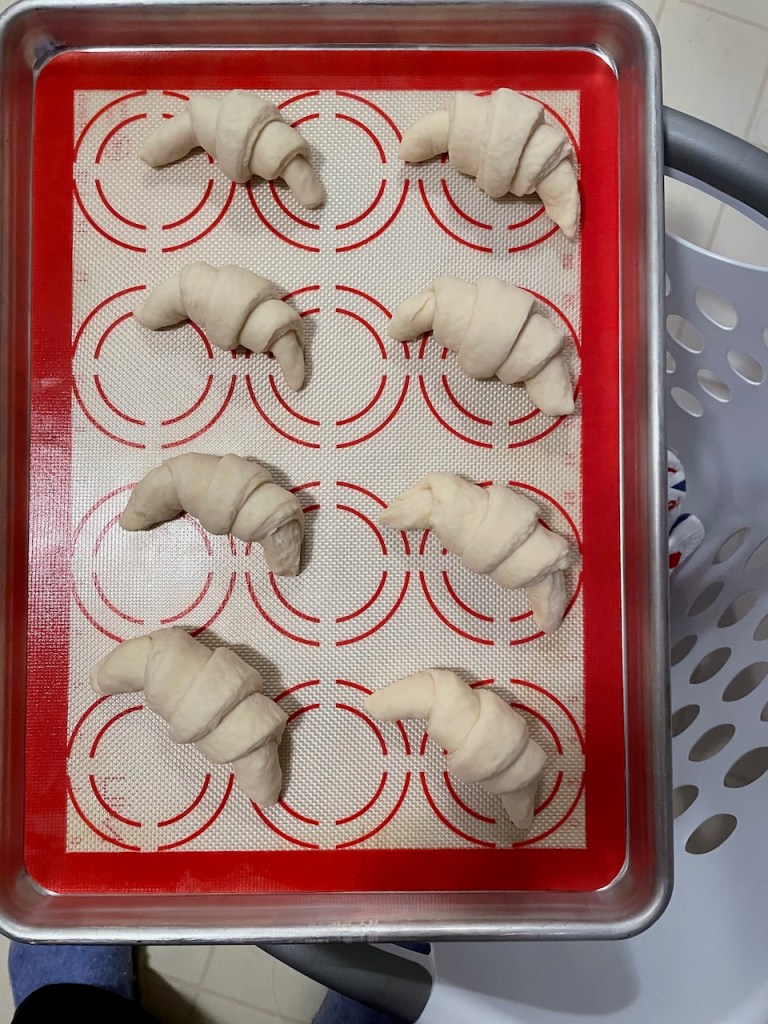
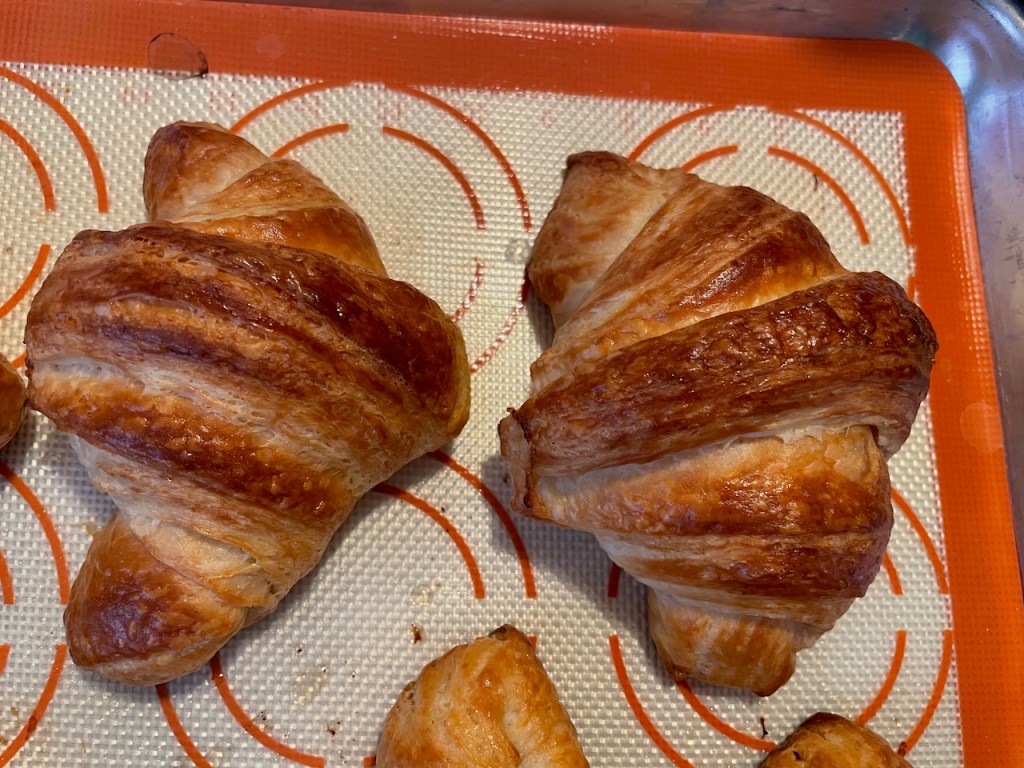
Anyway, the result was still wonderful. I ended up with a big pile of crispy, flaky, buttery croissants, and though my math says that each one was about 300 calories, I ate lots of them! I did freeze eight of them before the final proof, which worked well. The frozen ones just have to thaw and then rise, which means sitting out overnight (“Just like the Trader Joe’s croissants”, as Christine pointed out!), then bake them as with the others.
This experience made me want to make more croissants. Stay tuned!
[Yes, this is evidence that up to the posts in early December 2021, this blog was written far after-the-fact. I mean, during World War I, nobody referred to it as “World War I”, right?]